8% off










LAUNCH LTR-05 RF Sensor 315MHz & 433MHz TPMS Sensor Tool Metal Provides 98% Vehicle Coverage
Latest price: €13.84Buy Now: €12.69
8% off
Launch LTR-05 RF Sensor:
![[Free i-TPMS and CRT5001E] 100pcs LAUNCH LTR-05 RF Sensor 315MHz & 433MHz TPMS Sensor Tool Metal](/upload/pro-xs/24070817204967237477.jpg)
![[Free i-TPMS] 50pcs LAUNCH LTR-05 RF Sensor 315MHz & 433MHz TPMS Sensor Tool Metal](/upload/pro-xs/24070817204954762252.jpg)
![[UK/EU Ship] 4pcs LAUNCH LTR-05 RF Sensor 315MHz & 433MHz TPMS Sensor Tool with Launch i-TPMS Handheld TPMS Service Tool](/upload/pro-xs/25031717422791314407.jpg)
![[UK/EU Ship] 4pcs/Lot LAUNCH TSENSOR-05S RF TPMS Sensor Metal/Rubber](/upload/pro-xs/26052917800482836126.jpg)
5 Launch LTR-05 RF Sensor:
15th Anniversary Special Offer!
Sept. 30 – Oct. 30
Over 300 GBP Get Free Godiag J2534 (SP421-B)
Over 600 GBP Get Free Vgate vLinker (SP392)
Over 1000 GBP Get Free Godiag GT100 (SO537)
Whatsapp +86 13983755934
Sept. 30 – Oct. 30
Over 300 GBP Get Free Godiag J2534 (SP421-B)
Over 600 GBP Get Free Vgate vLinker (SP392)
Over 1000 GBP Get Free Godiag GT100 (SO537)
Whatsapp +86 13983755934
Ship SO855
Shipping:
Free Shipping
Standard Flat Rate Shipping ServiceEstimated delivery time: 7-15 working days.See details »
Weight:
41g
Package:
8.3cm*5.8cm*2cm
( Inch: 3.26*2.28*0.79 )
Returns:
Return for refund within 30 days,buyer pays return shipping. Read details »
€12.69
In Stock.
Free Shipping
Product Description
LAUNCH LTR-05 RF Sensor is compatible with more than 98% OE level sensors in 315MHz and 433MHz, can replace all the OE tire pressure sensors, copy the OE sensor data, and can be programmed for unlimited times.
LAUNCH LTR-05 RF-Sensor 315MHz & 433MHz
Packages offer
SO599 1pcs Launch LTR-05 RF sensor
SO599-4PCS 4pcs Launch LTR-05 RF sensor
SO599-4pcs+AD184 4pcs Launch LTR-05 RF sensor with i-TPMS
SO599-50pcs 50pcs Launch LTR-05 RF Sensor with free i-TPMS
SO599-100pcs 100pcs Launch LTR-05 RF Sensor with free i-TPMS and CRP505E
Compare LTR-03 RF Sensor and LTR-05 RF Sensor
LTR-05 udpated appearance, more Lighter All functions are the same !
| Model | LAUNCH LTR-03 | LAUNCH LTR-05 |
| Operating frequency | 315MHz/433MHz | 315MHz/433MHz |
| Battery voltage | 3.0V | 3.0V |
| RF transmitter power | 5~8dBm | 5~8dBm |
| Storage Temperature | -40°C~125°C | -40°C~125°C |
| Working Temperature | -40°C~125°C | -40°C~125°C |
| Dimension | 27*42*72 (mm) | 27.2*20*76.4 (mm) |
| Weight | 30g | 24g |
| IP Rating | IP67 | IP67 |
| Pressure Monitor Range | 0~800kPa | 0~800kPa |
| Pressure Reading Accuracy | ±10kPa | ±10kPa |
| Temperature Reading Accuracy | ±3℃ | ±3℃ |
Launch LTR-05 RF-Sensor Features:
1. Compatible with over 98% of OE-level sensors in 315MHz and 433MHz.
2. Able to replace all the OE tire pressure sensors, copy the OE sensor data, and can be programmed for unlimited times.
3. The pressure value of LTR-05 can be accurate to 0.1 BAR with an international leading automotive-grade chip.
4. Optimized RF antenna for better signal transmission
5. Over-the-air wireless programming and battery life lasts for 4 to 6 years.
6. Easy to install with a smaller body.
7. Compatible with Launch X-431 i-TPMS
How to install the LTR-05 RF-Sensor
1. Loosening the tire
Remove the valve cap and nut and deflate the tire.
Use the bead loosener to break the tire bead.
Caution: The bead loosener must be facing the valve.
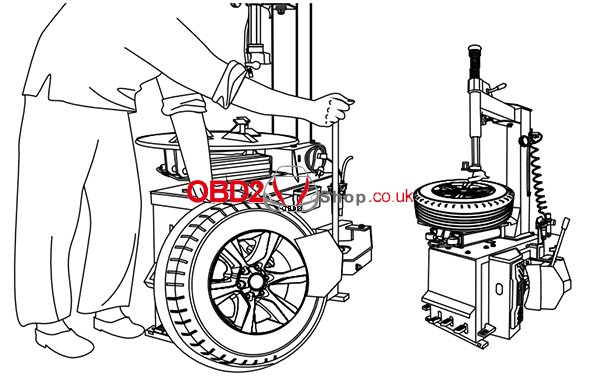
2. Dismounting the tire
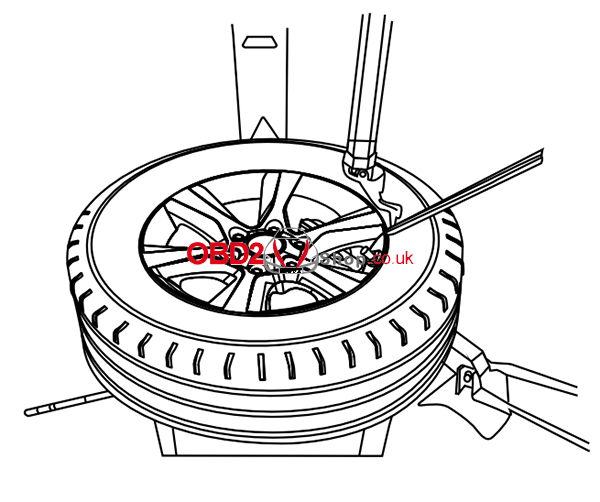
Clamp the tire on the tire changer, and adjust the valve at 1 o’clock to the tire fitting head. Use the tire tool to dismount the tire bead.
Caution: Always observe this starting point during the whole dismounting process.
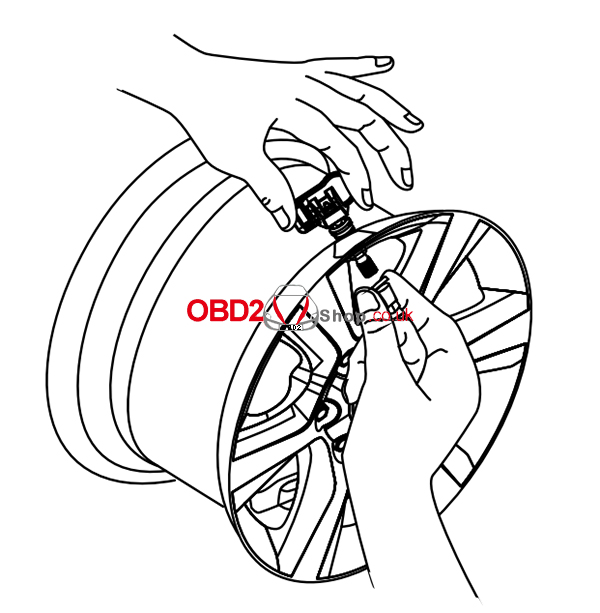
3. Dismounting the sensor
Remove the cap and nut from the valve stem, and then remove the sensor assembly from the wheel rim.
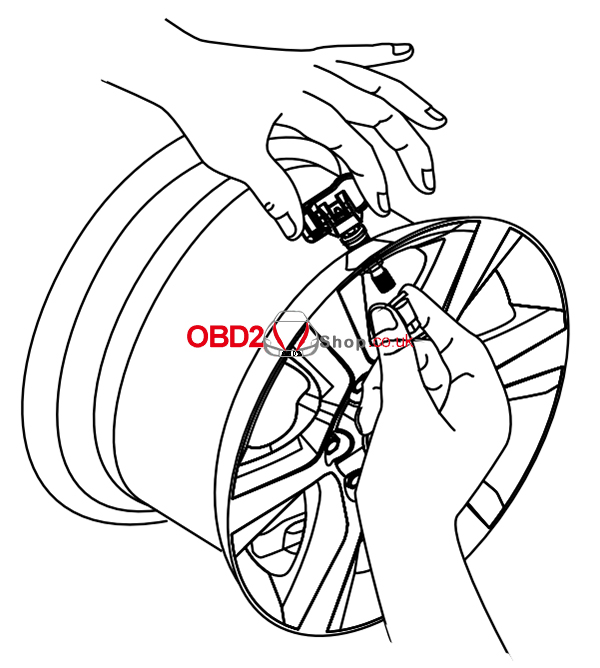
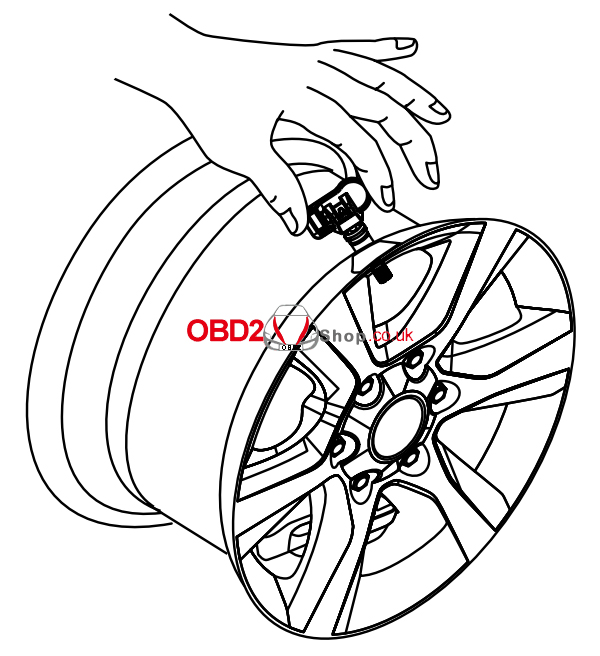
4. Mounting the sensor and valve
Step 1. Remove the cap and nut from the valve stem.
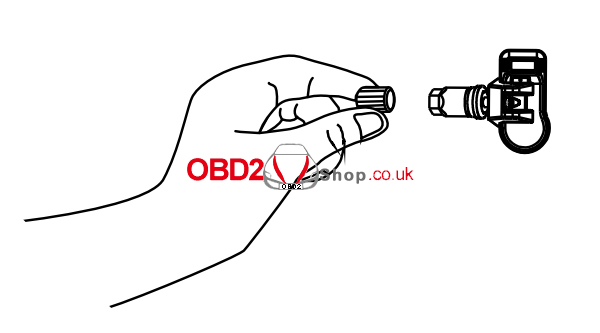
Step 2. Place the valve stem through the valve hole of the rim, ensuring the sensor body is located on the inside of the rim. Assemble the nut back on the valve stem with a torque of 4N·m, then tighten the cap.
Caution: Make sure that the nut and cap are installed on the outside of the rim.
5. Remounting the tire
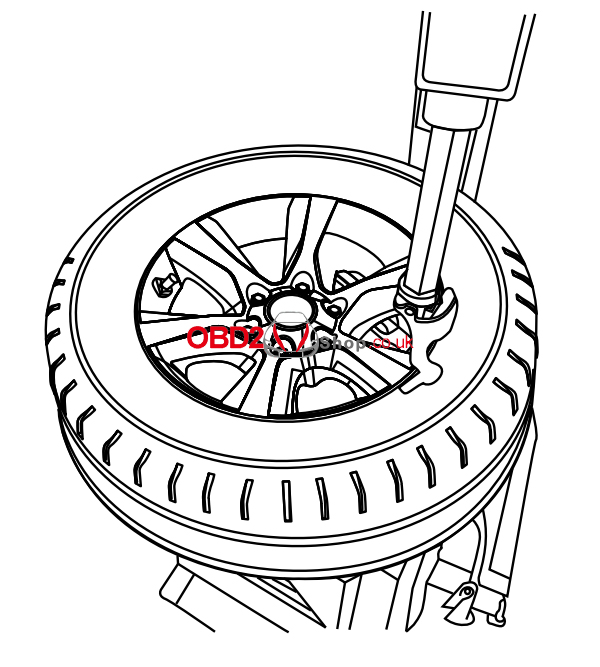
Place the tire on the rim, and ensure that the valve starts on the opposite side of the rim from the tire fitting head. Mount the tire over the rim.
Caution: Strictly follow the tire changer manufacturer’s instructions to mount the tire.
Package includes:
1pc x LAUNCH LTR-05 RF Sensor


Hot Branded Products:










Shipping method and delivery time:
UK Shipping (No Tax) : 2-4 working days arrive. For products marked " UK Ship " and UK local customer
EU shipping (No Tax) : 5-7 working days arrive. For products marked " EU Ship " and from EU countries, if not belong to EU, need to clearance
Yodel (No Tax) : 5-7 days arrive . For products UK out of stock, and customers from UK
Yun Express ( No Tax) : 5 - 9 working days to UK, 7-14 days to other European Countries.
Yanwen (No Tax) : 5 - 9 working days to UK, 7-14 days to other European Countries, ship to all over the world, mainly for UK/EU warehouse no stock
DHL: need to clearance, 3-5 working days arrive. Used for UK/EU no stock, customers request ship this way. Need to clearance, we will declare a low price on the invoice help to clearance.
If you have any questions about the device, the price, or the payment, please feel free to contact us.
Contact Person: Elyza
Whatsapp: +86 13983755934
Telephone: +86 13983755934
Wechat: +86 13983755934
Official Email: Sales@obd2shop.co.uk

Video
How to use replace Tire pressure sensor
Tech Support
This is a quick guide on how to install Launch LTR-01 RF Sensors to the tire.
Installation Steps
- Loosening the tire
Remove the valve cap and nut, deflate the tire. Use the bead loosener to break the tire bead.
Caution: the bead loosener must be facing the valve.
- Dismounting the tire
Clamp the tire on the tire changer, and adjust the valve at 1 o’clock to the tire fitting head. Use the tire tool to dismount the tire bead.
Caution: always observe this starting point during the whole dismounting process.
- Dismounting the sensor
Remove the cap and nut from the valve stem. And then remove the sensor assembly from the wheel rim.
- Mounting the sensor and valve
- Remove the cap and nut from the valve stem.
- Place the valve stem through the valve hole of the rim. Ensuring the LTR-01 RF Sensorbody located on the inside of the rim. Assemble the nut back on the valve stem with a torque of 4N m, then tighten the cap.
Caution: make sure that the nut and cap are installed on the outside of the rim.

Completed!
Now you can go on to use TPMS tool X-431 TSGUN Pro to program the sensors.